
Working with Windows Embedded Compact (WinCE/WEC7/WinCE7/WEC2013/WinCE6.0/WinCE5)
Sunday, July 24, 2016
iWave Systems announces: Windows Embedded Compact 7 (WEC7) BSP Support for NXP i.MX7 series processor
iWave Systems, a Proven Partner of NXP, has brought up the WEC7 (Windows Embedded Compact 7) on NXP’s i.MX7 series processor, providing its support for WEC7 reference Board Support Package (BSP) for NXP’s i.MX7D SDP board. With this expertise, iWave has proved that it can support WEC7 BSP on any i.MX7x based custom boards.

iWave Systems announces: Windows Embedded Compact 2013 BSP Support for NXP i.MX7 series processor
iWave Systems, eminently known worldwide for NXP i.MX based solutions, has brought up the WEC2013 (Windows Embedded Compact 2013) on NXP i.MX7 series processor, providing support for WEC2013 reference Board Support Package (BSP) for NXP’s i.MX7D SDP board. With this expertise, iWave has proved that it can support WEC2013 BSP on any i.MX7x based custom boards.

Saturday, July 16, 2016
Kernel for Windows Data Recovery - Your best friend in need!
In this digital era, when most of our activities, including personal photos, videos, work related documents, important files are kept in form of soft copies in some hard disk.
We all have that one fear, or rather, our worst nightmare that, what if the hard disk is corrupted one day?! All these documents are gone?! Hmm. Some of us would have experienced it already! :(
One of my friend, who was working in some government office, suddenly called me one day, and asked me for suggesting some data recovery software. He lost some important official document, His hard disk got corrupted and he didn't had any backup.
So I started searching a bit on these data recovery software available. I came across this: Kernel for Windows Data Recovery.

Let us first check how to use it.
I will start with, how to install Kernel for Windows Data Recovery.

Installation is way too simple.
1. Click on this link to download Kernel for Windows Data Recovery officially.
[ Link: http://www.nucleustechnologies.com/Windows-Data-Recovery-Software.html ]
2. You will get Nucleus-Kernel-FAT-NTFS.exe. Click on file to start installation.
3. Accept the agreement and click next, next, next and install. Once finished, you can launch the software.
How to use?
Usage is also fairly simple and very straightforward. Usable by any individual PC user also.
Open the application
If you have not registered, either register or apply the key that you got when you purchase the product.
Click here if you want to buy now!
Click on your choice. You can
1. Quick Scan
2. Extensive Scan
3. File Scan.
I did a quick scan on my hard disk. I can see many my old deleted files.

Select the needed hard disk.

Click Next

Click next.

Click on needed files that you need to recover, and click "Recover"! That's it. The rest will be taken care by Kernel! :)
 You can see progress bar.
 My some 700MB file took less than half a minute to recover.

There are many user settings available for power user.

In my opinion, this is one of the best data recovery software available for Windows recovery, especially for those individuals who have limited technical knowledge.
Here is the official website of Kernel for Windows Data Recovery.
[Link : http://www.nucleustechnologies.com/ ]
They have many other products such as:
Kernel for Exchange Server Recovery
Kernel for Windows Recovery
Kernel Exchange Suite
Kernel Outlook Suite
etc..
If you have used the product, or any other recovery tool, please let us know your experience, by commenting below. Thanks for reading
We all have that one fear, or rather, our worst nightmare that, what if the hard disk is corrupted one day?! All these documents are gone?! Hmm. Some of us would have experienced it already! :(
One of my friend, who was working in some government office, suddenly called me one day, and asked me for suggesting some data recovery software. He lost some important official document, His hard disk got corrupted and he didn't had any backup.
So I started searching a bit on these data recovery software available. I came across this: Kernel for Windows Data Recovery.
Let us first check how to use it.
I will start with, how to install Kernel for Windows Data Recovery.

Installation is way too simple.
1. Click on this link to download Kernel for Windows Data Recovery officially.
[ Link: http://www.nucleustechnologies.com/Windows-Data-Recovery-Software.html ]
2. You will get Nucleus-Kernel-FAT-NTFS.exe. Click on file to start installation.
3. Accept the agreement and click next, next, next and install. Once finished, you can launch the software.
How to use?
Usage is also fairly simple and very straightforward. Usable by any individual PC user also.
Open the application
If you have not registered, either register or apply the key that you got when you purchase the product.
Click here if you want to buy now!
 |
| Front page of Kernel application |
1. Quick Scan
2. Extensive Scan
3. File Scan.
I did a quick scan on my hard disk. I can see many my old deleted files.

Select the needed hard disk.

Click Next

Click next.

Click on needed files that you need to recover, and click "Recover"! That's it. The rest will be taken care by Kernel! :)


There are many user settings available for power user.

In my opinion, this is one of the best data recovery software available for Windows recovery, especially for those individuals who have limited technical knowledge.
Here is the official website of Kernel for Windows Data Recovery.
[Link : http://www.nucleustechnologies.com/ ]
They have many other products such as:
Kernel for Exchange Server Recovery
Kernel for Windows Recovery
Kernel Exchange Suite
Kernel Outlook Suite
etc..
If you have used the product, or any other recovery tool, please let us know your experience, by commenting below. Thanks for reading
Low cost development boards for experimenting/DIY purposes with Windows OS support
There are many low-cost, tiny, but yet powerful
development boards available for general use or development purposes. The main
pro of these boards is that, with few add-ons, can be used as a tablet or as a
PC also.
Here I’m listing few such boards or PCs.
These PCs supports latest version of Windows that is Windows 10. Few of these
boars uses ARM based processors, which supports Windows 10 IoT core, a version
of Windows 10 that is optimized for smaller devices.
RaspberryPi:
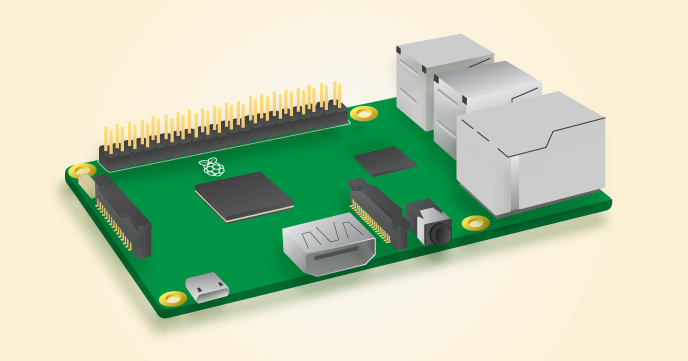
The RaspberryPi is a low cost, credit-card sized computer that
plugs into a computer monitor or TV, and uses a standard keyboard and mouse. It
is a capable little device that enables people of all ages to explore
computing, and to learn how to program in languages like Scratch and Python.
It’s capable of doing everything you’d expect a desktop computer to do, from
browsing the internet and playing high-definition video, to making
spreadsheets, word-processing, and playing games.
What’s more, the RaspberryPi has the
ability to interact with the outside world, and has been used in a wide array
of digital maker projects, from music machines and parent detectors to weather
stations and tweeting birdhouses with infra-red cameras. We want to see the
Raspberry Pi being used by kids all over the world to learn to program and
understand how computers work.
Latest version of RaspberryPi is RP3. See
specs. All these for just within Rs. 3000 in India.
1. A 1.2GHz 64-bit quad-core ARMv8 CPU
2.
802.11n Wireless LAN
3. Bluetooth 4.1
4. Bluetooth Low Energy (BLE)
5. 1GB RAM
6. 4 USB ports
7. 40 GPIO pins
8. Full HDMI port
9. Ethernet port
10. Combined 3.5mm audio jack and composite video
11. Camera interface (CSI)
12. Display interface (DSI)
13. Micro SD card slot (now push-pull rather than push-push)
14. VideoCore IV 3D graphics core
Website: https://www.raspberrypi.org
Coming to Windows support part, go to link:
https://developer.microsoft.com/en-us/windows/iot
Quoting it here:
Raspberry Pi 3 now available
Get your hands on the new Raspberry Pi 3 board with Windows 10 IoT
Core, now part of the NOOBS installer. We've released a new Windows 10 IoT Core
Insider Preview through Windows Insider that will let you take full advantage
of Raspberry Pi 3.
A link on RP.org: https://www.raspberrypi.org/blog/windows-10-for-iot/
You can also get one open source Windows CE
BSP for RaspBerryPi on codeplex: https://ceonpi.codeplex.com/
MinnowBoard MAX:

MinnowBoard MAX is the second generation
MinnowBoard (released in July 2014), updating and replacing the original
MinnowBoard. The MinnowBoard MAX board has an upgraded 64-bit Intel®Atom™
E3800 (Bay Trail-I) processor with better graphics and revised I/O, shrinks the
footprint by more than half, supports additional operating systems (Linux,
Android, and Windows) and significantly improves on the original board on
price, performance, and energy consumption.
Official website: http://wiki.minnowboard.org/MinnowBoard_MAX
Where to buy: http://www.mouser.in/MinnowBoard/
The price is around Rs. 15,000
BeagleBone Black:
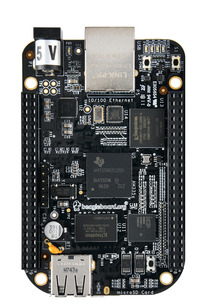
High-performance, low-power world with the
tiny, affordable, open-source Beagles. Putting Android, Ubuntu and other Linux
flavors at your fingertips, the Beagle family revs as high as 1GHz with
flexible peripheral interfaces and a proven ecosystem of feature-rich
"Cape" plug-in boards.
Official Website: https://beagleboard.org/black
1. Processor: AM335x 1GHz
ARM® Cortex-A8
2. 512MB DDR3 RAM
3. 4GB 8-bit eMMC on-board flash storage
4. 3D graphics accelerator
5. NEON floating-point accelerator
6. 2x PRU 32-bit microcontrollers
Connectivity
7. USB client for power & communications
8. USB host
9. Ethernet
10. HDMI
11. 2x 46 pin headers
Software Compatibility
12. Debian
13. Android
14. Ubuntu
15. Cloud9 IDE on Node.js w/ BoneScript library
Plus much more
So, there is no official Windows OS
available for this. But you can get an open source Windows CE BSP for
BeagleBone! Get it here on CodePlex: https://beaglebonebsp.codeplex.com/
Where to buy: http://in.element14.com/PFCMSContentRequest?isRedirect=true&bespokepage=e14/common/wp/promotions/beaglebone.jsp
Price is around Rs. 4000
LattePanda:

This one is very recent project, backed by
many backers on KickStarter, “LattePanda”!
LattePanda is featured with quad-core
1.8Ghz, 2/4G RAM, 32/64 GB eMMC, WIFI, Bluetooth 4.0 and USB 3.0, plus onboard
Arduino processor!
You will get pre-installed Windows 10, with
license key, total price is around 8000 INR!
Official Website: http://www.lattepanda.com/
Kickstarter Campaign: https://www.kickstarter.com/projects/139108638/lattepanda-a-45-win10-computer-for-everything
Intel Galileo:

The Intel® Galileo Gen 2 board is the first
in a family of Arduino-certified development and prototyping boards based on
Intel® architecture and specifically designed for makers, students, educators,
and DIY electronics enthusiasts.
• Intel® Quark™ SoC X1000 application
processor, a 32-bit, single-core, single-thread, Intel® Pentium® processor
instruction set architecture (ISA)-compatible, operating at speeds up to 400
MHz.
• Support for a wide range of industry
standard I/O interfaces, including a full-sized mini-PCI Express* slot, 100 Mb
Ethernet port, microSD slot, USB host port, and USB client port.
• 256 MB DDR3, 512 kb embedded SRAM, 8 MB
NOR Flash, and 8 kb EEPROM standard on the board, plus support for microSD card
up to 32 GB.
• Hardware and pin compatibility with a
wide range of Arduino Uno R3 shields.
• Programmable through the Arduino
integrated development environment (IDE) that is supported on Microsoft Windows, Mac OS, and Linux
host operating systems.
• Support for Yocto 1.4 Poky Linux release.
• 6-pin 3.3V USB TTL UART header replaces
3.5-mm jack RS-232 console port for Linux debug. New 6-pin connector mates with
standard FTDI* USB serial cable (TTL-232R-3V3) and popular USB-to-Serial
breakout boards. 12 GPIOs now fully native for greater speed and improved drive
strength.
• 12-bit pulse-width modulation (PWM) for
more precise control of servos and smoother response.
• Console UART1 can be redirected to
Arduino headers in sketches, eliminating the need for soft-serial in many
cases.
• 12V power-over-Ethernet (PoE) capable
(PoE module installation required).
• Power regulation system changed to accept
power supplies from 7V to 15V.
• The Intel® IoT Developer Kit for Intel®
Galileo Gen 2 adds C, C++, Python, and Node.js/Javascript support for
developing connected sensor Internet-of-Things applications.
• Intel Galileo also supports the Wyliodrin
platform that provides C, Python, Node.js, and Visual Programming environments
from a remotely-connected browser.
• In addition to open source Yocto Linux,
Intel Galileo Gen 2 supports VxWorks (RTOS), and now Microsoft Windows is supported directly from Microsoft.
Official Website: http://www.intel.com/content/www/us/en/do-it-yourself/galileo-maker-quark-board.html
Where to buy: http://www.intel.com/buy/us/en/product/emergingtechnologies/intel-galileo-gen-2-board-462661
Arduino development boards:

The Uno is a microcontroller board based on
the ATmega328P. It has 14 digital input/output pins (of which
6 can be used as PWM outputs), 6 analog inputs, a 16 MHz quartz crystal, a USB
connection, a power jack, an ICSP header and a reset button. It contains
everything needed to support the microcontroller; simply connect it to a
computer with a USB cable or power it with a AC-to-DC adapter or battery to get
started. You can tinker with your UNO without worrying too much about doing
something wrong, worst case scenario you can replace the chip for a few dollars
and start over again.
"Uno" means one in Italian and
was chosen to mark the release of Arduino Software (IDE) 1.0. The Uno board and
version 1.0 of Arduino Software (IDE) were the reference versions of Arduino,
now evolved to newer releases. The Uno board is the first in a series of USB
Arduino boards, and the reference model for the Arduino platform; for an
extensive list of current, past or outdated boards see the Arduino index of
boards.
Official website: https://www.arduino.cc/en/Main/ArduinoBoardUno
Where to buy: https://store.arduino.cc/
So, all these boards are very useful for
students or individuals who want to experiment with, or do some DIY Projects or
want to do small academic projects with embedded system and embedded software
such as Windows, Android or Linux. These boards are not only low-cost but also
very powerful and compact in size.
These
are also useful for individuals who want to use low-cost and compact PCs, as,
with some add-ons these boards will work as a simple tablet or PC!Saturday, July 2, 2016
A quick-start guide to build, setup, boot to, and use the UEFI shell
My new task is on UEFI (Unified EFI or
Unified Extensible Firmware Interface).
What is UEFI?
UEFI (Unified Extensible Firmware
Interface) is a standard firmware interface for PCs, designed to replace BIOS
(basic input/output system). This standard was created by over 140 technology
companies as part of the UEFI consortium, including Microsoft.
Source code is made open source and available in Tianocore GitHub and EDK2 SourceForge.
Source code is made open source and available in Tianocore GitHub and EDK2 SourceForge.
Some quick links on UEFI:
Official Website: http://www.uefi.org
Technical Wiki: http://wiki.phoenix.com/wiki/index.php/UEFI
Tianocore GitHub: https://github.com/tianocore/
EDK2 project on SourceForge: https://sourceforge.net/projects/edk2/
Intel FW develop: https://firmware.intel.com/develop
As title indicates, this post is mainly
about, “Quick-start guide to build and setup the UEFI shell”, for developing
and testing some simple UEFI applications.
I have used UDK2014 for my work. So, here
goes the steps that I have followed.
Step
1: Get UDK2014 from this link: https://sourceforge.net/projects/edk2/files/UDK2014_Releases/UDK2014/UDK2014.Complete.MyWorkSpace.zip/download
(You
can use UDK2015 as well, which is latest release from this link: https://sourceforge.net/projects/edk2/files/UDK2015_Releases/UDK2015/UDK2015.Complete.MyWorkSpace.zip/download
, but I have tested UDK2014.)
[Note: Your PC should have Visual Studio
2008 or 2010 installed.]
Step
2: The downloaded zip file contains two more zip
files. ie: BaseTools(Windows).zip and UDK2014.MyWorkSpace.zip.
First, extract UDK2014.MyWorkSpace.zip. You
will get MyWorkSpace folder which contains folders: Conf, CryptoPkg... etc.
Step
3: Now Unzip BaseTools(Windows).zip. You will get
two folders: BaseTools, Conf and edksetup.bat file. Copy and paste these files
to MyWorkSpace folder that you have got in step 2. If asked for replace, you
can either keep old files/folders or replace with new. Both are same.
Step
4: Copy this MyWorkSpace folder to any location of
your choise. In my experiments, I used C:\efi
The tree will look like below:
C:
|
|--à efi
|
|--à MyWorkSpace
|
|--à BaseTools
|--à Conf
|--à CryptoPkg
|--à etc....
Step 3: Open command prompt and cd to
MyWorkSpace\
cd
C:\efi\MyWorkSpace
Step 4: Type the command
edksetup
--NT32
to initialize the build environment.
You may see below error:
!!!
ERROR !!! No tools path available. Please set EDK_TOOLS_PATH !!!
or similar.
Step
5: Type the command:
set
EDK_TOOLS_PATH=c:\efi\myworkspace\basetools
ie: Path for your BaseTools folder (myworkspace\basetools).
Step
6: Run the command
edksetup
--NT32
again to initialize the build environment.
You will see something like these lines:
C:\efi\MyWorkSpace>edksetup --NT32
PATH = C:\efi\MyWorkSpace\BaseTools\Bin;C:\efi\MyWorkSpace\BaseTools\Bin\Win32;C:\Program
Files (x86)\Microsoft Visual Studio 9.0\Common7\IDE;C:\Program Files
(x86)\Microsoft Visual Studio 9.0\VC\BIN;C:\Program Files (x86)\Microsoft
Visual Studio 9.0\Common7\Tools;C:\Windows\Microsoft
.NET\Framework\v3.5;C:\Windows\Microsoft.NET\Framework\v2.0.50727;C:\Program
Files (x86)\Microsoft Visual Studio 9.0\VC\VCPackages;C:\Program
Files\Microsoft
SDKs\Windows\v6.0A\bin;C:\ProgramData\Oracle\Java\javapath;C:\Program Files\Common
Files\Microsoft Shared\Windows Live;C:\Program Files (x86)\
Common Files\Microsoft Shared\Windows
Live;C:\Program Files (x86)\Intel\iCLS Client\;C:\Program Files\Intel\iCLS
Client\;C:\Windows\system32;C:\Windows;C:\Windows\System32\Wbem;C:\Windows\System32\WindowsPowerShell\v1.0\;C:\Program
Files\Intel\Intel(R) Management Engine Components\DAL;C:\Program Fil
ogram Files\TortoiseSVN\bin;C:\Program
Files\Microsoft Network Monitor 3\;C:\Program Files (x86)\Skype\Phone\;C:\Program
Files (x86)\Atmel\sam-ba_2.16\drv\;C:\Program Files
(x86)\Atmel\sam-ba_2.16;C:\Program Files
(x86)\Google\Chrome\Application;C:\Users\keshavagn\AppData\Local\Programs\Git\cmd
WORKSPACE =
C:\efi\MyWorkSpace
EDK_TOOLS_PATH =
C:\efi\MyWorkSpace\BaseTools
Rebuilding of tools is not required. Binaries of the latest,
tested versions of the tools have been
tested and included in the
EDK II repository.
If you really want to build the tools, use
the ForceRebuild option.
!!! WARNING !!! No CYGWIN_HOME set, gcc
build may not be used !!!
C:\efi\MyWorkSpace>
Step
7: Build the virtual BIOS environment:
build -t
VS2008x86
for Visual Studio 2008. (build -t VS2008
for 32 bit machines)
build -t
VS2010x86
for Visual Studio 2010. (build -t VS2010
for 32 bit machines)
Note: alternately, you can edit C:\efi\MyWorkSpace\Conf\target.txt,
change
TOOL_CHAIN_TAG = VS2008x86
[or any applicable value], Save, and then
just run command
build
You will see lines like below:
C:\efi\MyWorkSpace>build -t VS2008x86
Build environment: Windows-7-6.1.7601-SP1
Build start time: 10:12:46, Jun.30 2016
WORKSPACE = c:\efi\myworkspace
ECP_SOURCE = c:\efi\myworkspace\edkcompatibilitypkg
EDK_SOURCE = c:\efi\myworkspace\edkcompatibilitypkg
EFI_SOURCE = c:\efi\myworkspace\edkcompatibilitypkg
EDK_TOOLS_PATH = c:\efi\myworkspace\basetools
Architecture(s) = IA32
Build target = DEBUG
Toolchain = VS2008x86
Active Platform =
c:\efi\myworkspace\Nt32Pkg\Nt32Pkg.dsc
Flash Image Definition = c:\efi\myworkspace\Nt32Pkg\Nt32Pkg.fdf
Processing meta-data ...
etc
At the completion of compilation, you will
see below window:


Step
8: Now build is completed. You can open UEFI
emulator!
cd to Build\NT32IA32\DEBUG_VS2010x86\IA32
cd
Build\NT32IA32\DEBUG_VS2010x86\IA32
and open SECMAIN.EXE
secmain.exe
It will open emulator as shown below.

A virtual machine will start and you will
boot to an EFI shell.
So here comes UEFI shell, on emulator
window:


Type “help” to see all supported commands:


Type “helloworld.efi”, to open helloworld.efi
application. (The code resides at: C:\efi\MyWorkSpace\MdeModulePkg\Application\HelloWorld)


Step
9: How to boot an UEFI-compatible (?) PC to UEFI
shell?
i.
Copy the file: C:\efi\MyWorkSpace\EdkShellBinPkg\FullShell\X64\Shell_Full.efi
to a pen-drive (thumb-drive) as: \EFI\BOOT\BOOTX64.efi .
ii.
Boot the PC with this pen-drive
connected to PC’s USB port.
iii.
Press F12. You will see screen
below.

iv.
Navigate to your pen-drive name
(“UEFI: Generic-SD/MMC 1.00” in my case).
v.
Press Enter. You will see UEFI shell (same as
above emulator pics)
Step
10: So, my intention was to (create and) open one
helloworld application. There is one helloworld application already. But in all
these steps, we built the binary for IA32. Not x86. So you won’t be able to run
helloworld.efi on actual UEFI shell.
For this, we need to build helloworld.efi
for x86. Do the below changes for doing this:
For building, use this command:
Build
-t VS2008x86 -a X64 -p MdeModulePkg/MdeModulePkg.dsc
[Alternatively, you can also edit
“target.txt” as explained already, with above parameters]
You will see below lines:
C:\efi\MyWorkSpace>Build -t VS2008x86 -a
X64 -p MdeModulePkg/MdeModulePkg.dsc
Build environment: Windows-7-6.1.7601-SP1
Build start time: 10:51:38, Jun.30 2016
WORKSPACE = c:\efi\myworkspace
ECP_SOURCE = c:\efi\myworkspace\edkcompatibilitypkg
EDK_SOURCE = c:\efi\myworkspace\edkcompatibilitypkg
EFI_SOURCE = c:\efi\myworkspace\edkcompatibilitypkg
EDK_TOOLS_PATH = c:\efi\myworkspace\basetools
Architecture(s) = X64
Build target = DEBUG
Toolchain = VS2008x86
Active Platform =
c:\efi\myworkspace\MdeModulePkg\MdeModulePkg.dsc
Processing meta-data ...
.
etc.
.
Generating code
Finished generating code
"GenFw" -e DXE_SMM_DRIVER -o
c:\efi\myworkspace\Build\MdeModule\DEBUG_VS2008x86\X64\MdeModulePkg\Universal\Acpi\SmmS3SaveState\SmmS3SaveState\DEBUG\SmmS3SaveState.efi
c:\efi\myworkspace\Build\MdeModule\DEBUG_VS2008x86\X64\MdeModulePkg\Universal\Acpi\SmmS3SaveState\SmmS3SaveState\DEBUG\SmmS3S
aveState.dll
copy /y
c:\efi\myworkspace\Build\MdeModule\DEBUG_VS2008x86\X64\MdeModulePkg\Universal\Acpi\SmmS3SaveState\SmmS3SaveState\DEBUG\SmmS3SaveState.efi
c:\efi\myworkspace\Build\MdeModule\DEBUG_VS2008x86\X64\MdeModulePkg\Universal\Acpi\SmmS3SaveState\SmmS3SaveState\OUTPUT
1 file(s) copied.
copy /y
c:\efi\myworkspace\Build\MdeModule\DEBUG_VS2008x86\X64\MdeModulePkg\Universal\Acpi\SmmS3SaveState\SmmS3SaveState\DEBUG\SmmS3SaveState.efi
c:\efi\myworkspace\Build\MdeModule\DEBUG_VS2008x86\X64
1 file(s) copied.
copy /y
c:\efi\myworkspace\Build\MdeModule\DEBUG_VS2008x86\X64\MdeModulePkg\Universal\Acpi\SmmS3SaveState\SmmS3SaveState\DEBUG\*.map
c:\efi\myworkspace\Build\MdeModule\DEBUG_VS2008x86\X64\MdeModulePkg\Universal\Acpi\SmmS3SaveState\SmmS3SaveState\OUTPUT
c:\efi\myworkspace\Build\MdeModule\DEBUG_VS2008x86\X64\MdeModulePkg\Universal\Acpi\SmmS3SaveState\SmmS3SaveState\DEBUG\SmmS3SaveState.map
1 file(s) copied.
- Done -
Build end time: 10:54:40, Jun.30 2016
Build total time: 00:03:02
C:\efi\MyWorkSpace>
After build is completed, go to folder: C:\efi\MyWorkSpace\Build\MdeModule\DEBUG_VS2008x86\X64
. Helloworld.efi resides here.
Just copy this to your pen-drive. Boot into
UEFI as explained already, and type command: helloworld.efi. Congratulations.
You have successfully opened one UEFI app! ;)
I will write about how we can create new
application package and build your first UEFI app in a new blog post. :) Thanks.
[Disclaimer: The name of this blog is WEC7 (Windows Embedded Compact 7). WEC7 was my first project, and I was working on different versions of WinCE (Windows CE) from last four years. But I write any article related to Embedded Software, as my work includes not just WinCE, but any OS or BIOS or boot loader. This is one such post. J This blog post is not related to WinCE in any manner. ;)
The UEFI source code is open source, and so is this blog post :) Many parts of post may be taken from somewhere on internet, and put together by me as I went on working. :P
Thanks . :) ]
Subscribe to:
Posts (Atom)